750 grammes
Tous nos blogs cuisine Suivre ce blog Administration + Créer mon blog
9 septembre 2010 4 09 /09 /septembre /2010 22:34

tarte pêche 1 ok


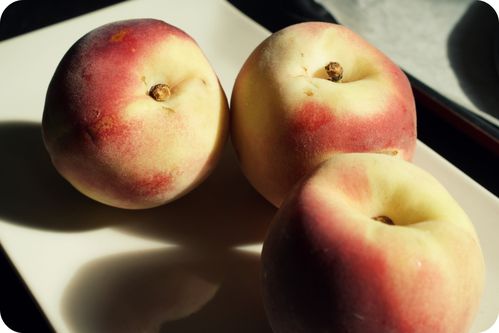
C'est déjà la fin de l'été, comme nous le rappelle le temps pluvieux d'aujourd'hui... J'ai de la chance car dans quelques jours, je m'envole vers l'Australie et le début du printemps donc un nouvel été en perspective!! Mon appartement ne ressemble plus à grand chose et aujourd'hui, c'était ma dernière journée de cuisine avant le grand départ... Pour dire au revoir à tout le monde, les pots se sont succédés et avec les essais culinaires! aujourd'hui c'est la tarte pêche blanche groseille que je vous propose, toute simple et rapide si vous prenez une pâte feuilletée tout prête. J'ai voulu apporter un peu de moelleux avec un fond noisette et j'adore les groseilles qui font des colliers de perles aux pêches!!


pêches ok


pêches2 ok


Ingrédients:

1 pâte feuilletée (et parce que c'est quand même meilleur fait maison, je vous renvoie sur la recette très bien expliquée de Mercotte!)

3 pêches blanches

125g de groseilles

60g de noisettes en poudre

30g de beurre

20g de sucre

1 oeuf

sucre glace


fond tarte ok

fond tarte rempli ok 


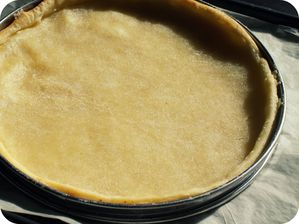
 Faites cuire à blanc  votre pâte feuilletée pendant 15 minutes à 180°C, enlevez le papier sulfurisé et laissez un peu refroidir.

Préparer l'appareil à la noisette, mélangez la poudre de noisette avec l'oeuf battu, le sucre et le beurre fondu puis étalez le sur le fond de tarte,

Répartissez les pêches coupées en quartier, puis les groseilles entre les pêches et au centre, saupoudrez de sucre glace,

Enfournez pour 10 minutes à 180°C puis finissez par 5 minutes au grill pour faire légèrement caraméliser les pêches.

Dégustez tiède ou froid!!


tarte pêche ok


tarte pêche groseille ok


sucre glace ok


In English please!

An end-of-summer tart: white peach and recurrant tart


It's the end of summer already, as the rainy day today is keen to remind us...I'm lucky, in a few days I'll be flying to Australia where spring is just beginning, so I'll be going to a second summer, you might say! My flat doesn't look like much at the moment, this is my last day of cooking before the big move..! To say goodbye (or rather au revoir) to everyone, my pots and pans have been doing me proud with my culinary efforts!

Today I offer you a white peach and redcurrant tart, very quick and easy to make if you use pre-made puff pastry. I wanted the dish to have a bit of softnes, with a hazelnut-flavoured base and I love redcurrants, they look like lovely pearl necklaces on the peaches!

Ingredients:

1 lot of puff pastry (and because it's always better when it's homemade, have a gander at Mercotte's very well explained recipe!)
3 white peaches
125g redcurrants
60g ground hazelnuts
30 butter, melted
20g sugar
1 egg, beaten
icing sugar, to dust

Blind bake your puff pastry for 15 mins at 180 degrees C. Once they are done, take out the greaseproof paper and let the tart cool a little.

Prepare the hazelnut filling:
Mix the ground hazelnut with the beaten egg, sugar and melted butter. Spread onto the tart base.

Thickly slice the peaches and place them evenly around the tart base, then add the redcurrants between the peaches and in the centre. Sprinkle with icing sugar.

Bake for 10 minutes at 180 degrees C then finish the tart with 5 minutes under the grill to slowly caramelise the peaches.

Enjoy warm or cold!


Rendez-vous sur Hellocoton !

Partager cet article
Repost0
26 août 2010 4 26 /08 /août /2010 18:08


1vue ok

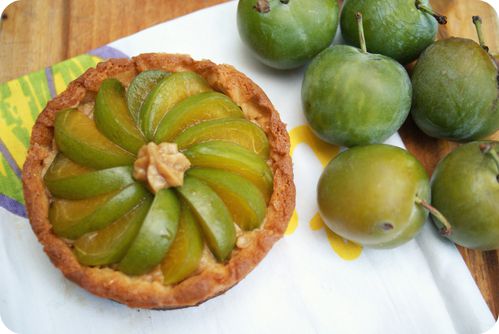
De la pâte de speculoos à utiliser au retour de mon week-end lillois, des reine-claude qui me tendent les bras au marché = envie d'une tartelette franco-belge riche en saveurs et textures! Dans cette recette la pâte est une composante essentielle, ne la remplacez pas par une pâte du commerce, essayez la pâte sucrée et vous ne pourrez plus vous en passer!!! La tartelette est croustillante et gouteuse, on tombe ensuite sur l'onctueux mélange au spéculoos puis sur la fraicheur et la saveur légèrement acidulée de la reine-claude...(mais il m'en reste même plus pour accompagner l'écriture de la recette... )


Ingrédients pour 2 tartelettes:

pour la pâte sucrée (ces proportions vous permettent de faire bien plus que 2 tartelettes, mais c'est plus pratique de ne pas diviser l'oeuf et la pâte sucrée se congèle très bien!)

210g de farine

40g de poudre d'amande

100g de beurre à température ambiante

100g de sucre glace

1 oeuf

1 pincée de sel

1cc de cannelle


pour la garniture

50g de pâte de speculoos (j'ai utilisée celle-la mais il en existe d'autres et vous pouvez tenter de la faire vous même)

50g de fromage frais (type Saint-Moret)

4 reines-claudes mûres mais pas trop sucrées (la pâte de speculoos s'en charge!)


détail2 ok


Préparez la pâte:

Battez le beurre à température ambiante avec le sucre glace jusqu'à obtenir un mélange crémeux. Rajoutez alors l'oeuf et homogénéisez. Ajoutez la farine, la poudre d'amande, le sel et la canelle et mélanger jusqu'à obtenir une boule homogène (je termine à la main pour assurer un bon mélange). Sur le plan de travail fariné, "fraisez" la pâte (pour la rendre plus homogène) puis formez une boule, filmez et réservez au frais pendant 30 minutes.


Préchauffez le four à 180°C


détail 1 ok


Sortez la pâte, étalez la entre 2 feuilles de papier sulfurisé pour éviter de rajouter trop de farine sur une épaisseur de 4 à 5 mm. Découpez des ronds de pâte d'un diamètre de 5cm supérieur à votre moule à tarte et bloquez au froid pendant 30 minutes pour pouvoir foncer vos moules à tarte sans abîmer la pâte. Foncez vos moules avec la pâte (je vous renvoie à la technique en image plutôt que de vous faire 10 lignes incompréhensibles!!) puis recouvrez votre pâte de papier sulfurisé, couvrez de légumes secs ou de plomb de cuisine et enfournez pour 15 minutes à 180°C (pour les tartelettes et un peu plus longtemps so vous choisissez de faire une tarte). Retirez alors le papier sulfurisé et remettez à dorer pendant 2/3 minutes.

Laissez refroidir les fonds de tarte.


crème ok


1gros plan ok 


Préparez la garniture:

Mélangez le fromage frais et la pâte de speculoos jusqu'à homogénéisation complète et garnissez en les fonds de tarte refroidis (n'hésitez pas à gouter pour avoir une garniture à votre goût car la pâte de speculoos est quand même assez sucrée!).

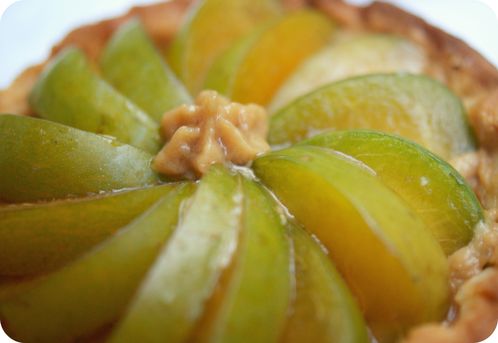
Coupez les reins-claudes en petit quartier et disposez en rosace sur le mélange fromage frais/spéculoos.


Dégustez!


2vue ok


de haut ok


In English please!
Franco-Belgian treat: reine-claude tart with speculoos spread


I had some speculoos spread to use after my weekend in Lille, and some reine-claude plums which I couldn't resist at the market, so I wanted to make a little Franco-Belgian tart that was rich in flavours and textures!

The pastry is an essential ingredient in this recipe, don't replace it with a shop-bought one - try sweetened pastry and you will never go back! The tart is crisp and flavoursome, the first thing to hit you is the creamy speculoos spread, then the fresh, slightly acidic flavour of the plum (but sadly there isn't any left for me to enjoy while writing up the recipe...)

Ingredients for 2 little tarts:

for the sweet pastry (these measurements make much more than 2 small tarts but it's easier to make this much as you don't have to divide the egg and the pastry does freeze very well!)

210g flour
40g ground almonds
100g butter, at room temperature
100g icing sugar
1 egg
a pinch of salt
1tsp cinnamon

For the filling:

50g speculoos spread (I used this one but there are others, and you could even try making it yourself!)
50g cream cheese (the Saint-Moret in my case but Philadelphia will do it perfectly)
4 reine-claude plums, ripe but not too sweet (the speculoos takes care of that!)

To make the pastry:

Cream the butter with the icing sugar until smooth and fluffy. Add the egg and mix until smooth. Add the flour, ground almonds, the salt and cinnamon and mix it all together until you have a ball of dough (I finish it off by hand to make sure it's well mixed).

On a floured work surface, "knead" the pastry (to make it smoother) and then form a ball, wrap it in clingfilm and put it in the fridge or a cool place for 30 minutes. Preheat the oven to 180 degrees C.

Take the pastry out of the fridge, roll it out over 2 sheets of greaseproof paper to avoid having to add too much flour. Roll it out to a thickness of about 4-5mm. Cut out circles of pastry about 5cm larger than your tart will be and keep these cold for 30 minutes so that you can put them in the tart mould without damaging the pastry. Put the pastry inside the tart mould (I'm showing you this set of instructions with pictures rather than trying to write 10 lines explaining it myself which don't make any sense!), then cover it with your sheets of greaseproof paper, cover with dry beans or baking beans and blind bake the tarts for 15-18 minutes at 180 degrees C (for the small tarts but longer if you are making one large tart). Take out the greaseproof paper and put the tarts back in the oven for 2-3 minutes to brown.
Let the tart bases cool.

To make the filling:

Mix the fromage frais with the speculoos spread until it forms a completely smooth paste. Spread this onto the bottom of the cooled tart base (feel free to taste the mix before adding it to the tart base so you can make sure it it's to your liking - the speculoos spread is quite sugary on its own).

Cut the plums into thickish slices and place them en rosace (in a circle) on top of the fromage frais/speculoos spread mix.

Enjoy!


Rendez-vous sur Hellocoton !

Partager cet article
Repost0
23 août 2010 1 23 /08 /août /2010 18:30

cupcake-2-ok.jpg


Deuxième volet d'un week-end lillois riche en cuisine, une après-midi pâtisserie nous a permis d'élaborer des cupcakes très girly aux couleurs noir et rose. L'association framboise/chocolat a déjà fait ses preuves et elle apporte ici un jeu de textures supplémentaires avec le coeur fondant de framboise au centre du gateau moelleux! Les muffins chocolat framboise peuvent être dégustés tel quels ou customisés comme des cupcakes. Ici ils ont été glacés avec du fondant patissier aromatisé au cacao ou à la fleur d'hibiscus (qui apporte vraiment un plus côté saveur!). Rapides à faire, ils sont parfait pour un tea-time entre filles!!!


Ingrédients pour les muffins chocolat framboise:

pour une quinzaine de muffins (sur une base de pâte ELLE à table n°61):

 3 oeufs

150g de sucre 

200g de farine

1/2 sachet levure chimique

150g de beurre fondu

125g d'amandes en poudre

5 cs de chocolat en poudre (ici du Banania équitable que je vous conseille vivement pour cette recette avec son délicieux goût chocolat/banane!!)

200 g de framboises (fraîches ou congelées, ici elles sont congelées car pas de framboises fraîches accessibles)


Ingrédients pour le glaçage:

pour le glaçage rose Hibiscus

3 cs de fondant patissier (dans les épiceries spécialisées, pour moi chez G.Detou à Paris, ou sur internet)

2 cs du mélange pour infusion Quai Sud rose shocking (ou autre infusion/thé à l'hibiscus pour avoir une belle couleur rose!) + 4cs d'eau très chaude

3 cs de jus de framboise (ici le jus des framboises obtenu par la décongélation)


pour le glaçage cacao

3 cs de fondant patissier

2 cc de chocolat en poudre (au risque de me répéter le petit gout banane du Banania équitable a fait merveille dans cette recette!! par contre je précise que je n'ai aucune part chez Banania!!!)

2 carré de chocolat noir dessert

6 cs de lait

 gros plan 2 ok

gros plan ok   


Préparez d'abord les glaçons de framboise en les mixant avant de verser le coulis obtenu dans un bac à glaçon, réservez au moins 2 heures au congélateur.

Préchauffez le four à 180°C, préparez les muffins en battant énergiquement le sucre et les oeufs puis incorporez la farine, la levure, le cacao et les amandes en poudre.

 Versez dans les moules à muffins (ici caissette papier ou moules silicones qui permettent d'éviter de beurrer le moule!) jusqu'à 1 cm du bord du moule (le glaçon framboise fera remonter la pâte. Lorsqu'ils sont pris, mettez les glaçons dans la pâte à muffins (en appuyant plus ou moins selon ce que vous voulez obtenir, un joli effet avec la framboise apparente ou une délicieuse surprise en enfonçant la framboise à coeur!)

Puis enfournez pour 15 à 20 minutes en vérifiant la cuisson en plantant la pointe d'un couteau.

Lorsque les muffins sont cuits, attendre le refroidissement complet avant de les glacer


Préparez les glaçages:

Préparez l'infusion à l'hibiscus et laissez infuser quelques minutes pour avoir un goût et une couleur prononcés, versez alors sur le fondant et remuez énergiquement pour que le "fondant fonde" et se retrouve avec une belle couleur rose Barbie (!!), rajoutez alors le jus de framboise, mélangez et réservez au réfrégirateur (pendant 10 à 15 minutes, cela dépend vraiment des frigos, il faut que le fondant reprenne un peu de tenue pour ne pas trop couler lorsqu'on l'applique mais qu'il reste malléable) avant de glacer vos muffins.

Pour le glaçage chocolat, diluez le cacao dans le lait chaud et ajoutez le chocolat patissier en petits morceaux, mélangez bien jusqu'à obtenir une préparation homogène. Versez le chocolat chaud sur le fondant et procédez comme pour le glaçage rose!!


Il ne vous reste plus qu'à déguster en papotant entre filles! (ici nous avons dégusté les cupcakes avec l'infusion servie glacée avec un glaçon framboise!)


gros plan 3 ok


In english please !

Girly chocolate rasperry cupcakes

This is the second recipe from my food-filled weekend in Lille. A cake-making afternoon turned into a chance for us to zhuzh up these cupcakes by making them pink and black. The strawberry and chocolate combination is rightly popular and in these cakes the melting raspberry centre adds an interesting texture to the moist cake! The raspberry and chocolate muffins can be eaten just as they are or customised as cupcakes. We iced them with pre-made icing flavoured with chocolate and hibiscus flowers (which really adds something to the flavour!) They are quick to make so are perfect for a girly tea!

Ingredients for the chocolate and raspberry muffins (makes 15)

3 eggs
150g sugar
200g flour
1//2 sachet (about 1tsp) baking powder
150g butter, melted
125g ground almonds
5 soup spoons cocoa powder (here some Banania is just right, I can't advise you strongly enough to try it with this recipe, the chocolate and banana taste is delicious!)
200g raspberries (fresh or frozen, we used frozen because we couldn't get hold of any fresh ones)

For the pink hibiscus icing:

3 soup spoons of pre-made icing (available at specialist grocers, I got mine at G. Detou in Paris, or it is available online)
2 soup spoons of the Quai Sud shocking pink infusion (or another infusion or hibiscus tea to obtain the shocking pink colour!) + 4 soup spoons of very hot water
3 soup spoons of raspberry juice (we use the juice the raspberries produced while defrosting)

For the chocolate icing:

3 soup spoons of pre-made icing (as above)
2 soup spoons of cocoa powder (at the risk of repeating myself here, the taste of banana in Banania worked so well with this recipe! Of course, I must add that I do not own any shares in Banania!)
2 squares of dark cooking chocolate
6 soup spoons milk

First make the raspberry ice cubes:

Mash the raspberries before dividing the resulting juice into an ice-cube tray. Put them in the freezer for at least two hours.

Preheat the oven to 180 degrees C, and begin the muffins by beating together the eggs and sugar. Add the flour, baking powder, cocoa powder and the ground almonds and continue to mix thoroughly.

Pour the mixture into the muffin tins (we used greaseproof paper but a silicone tn would also do to prevent having to grease the tin!) so it's about 1cm high (the raspberry ice cube will make the mixture rise more). When all the tins have some batter in them and the ice cubes are set, ad one to each muffin tin (you can create whichever effect you like, having the raspberry filling on top is pretty, or hiding inside the muffin as a delicious surprise for when you bite into the cake is also good!)

Bake the muffins in the oven for 15-20 minutes. Check them with the end of a knife or skewer to see that they are cooked. Once the muffins are cooked, set them aside to cool completely before icing them.

To make the pink icing:

Prepare the hibiscus infusion and let it infuse for a few minutes so the colour and flavour are at their best. Pour it into the icing and stir quickly so that the icing "defrosts", as it were, and and becomes smoother and a lovely Barbie pink colour. Next add the raspberry juice, mix it in and put the icing in the fridge for about 10-15 mins (it depends on the fridge though, the icing must be firm enough that it will not drip when applied but also stay workable) before icing the muffins.

For the chocolate icing:

Dilute the cocoa powder milk and add the cooking chooclate a little bit at a time. Mix until smooth and even. Pour the hot chocolate mixture into the pre-made icing and continue as for the pink icing.

Now all you have to do is enjoy them while having a natter with your girls! (We served them with the iced infusion with a raspberry ice cube!


Rendez-vous sur Hellocoton !

Partager cet article
Repost0
22 août 2010 7 22 /08 /août /2010 00:38

muffin chocolat noisette ok 

Muffins légers à la noisette, glaçage au chocolat épicé


Une première recette facile et rapide pour inaugurer mon blog! Ces muffins sont légers grâce au blancs en neige et relevés grâce au chocolat épicé, parfaits pour un petit gouter!


Ingrédients pour 12 muffins :
4 petits œufs
140 g de sucre
90 g de poudre de noisette
100 g de farine
1 sachet de levure chimique
70 g de beurre
25 g d’huile de noix

Ingrédients pour le glaçage au chocolat épicé
100 g de beurre
85 g de chocolat épicé (type Xocoméli chez G.Detou ou sinon du chocolat à 70% dans lequel vous rajoutez cannelle, vanille, gingembre moulu selon vos goûts)
15 g de lait
130 g de sucre glace

Préparez d’abord les muffins :

Préchauffez le four à 180°C
Séparez les blancs de jaunes et battez les jaunes avec le sucre jusqu’à ce que le mélange blanchisse et double de volume
Ajoutez la poudre de noisette puis le beurre fondu et l’huile de noix avant d’incorporer la farine et la levure tamisées
Incorporer enfin délicatement les blancs battus en neige
Versez la préparation dans les moules à muffins (que vous aurez beurré s’il ne sont pas en silicone)
Enfournez pour 15 minutes (ou moins selon votre four, vérifiez avec la pointe d’un couteau qui doit ressortir sèche)
Réservez jusqu’à ce que les muffins soient refroidis

Préparez le glaçage :

Une fois le beurre à température ambiante, et travaillez le en pommade
Faites fondre le chocolat au bain-marie avec le lait
Lorsque le chocolat est tiède, incorporez le doucement au beurre pommade
Ajoutez petit à petit le sucre glace
Dès que le glaçage est tiède, nappez en les muffins à la spatule ou à la poche à douille

Laissez 1 à 2 heures au réfrigérateur le temps que le glaçage « prenne »

Dégustez !!


 In english please!

Hazelnut muffins with spiced chocolate icing,

A quick and easy recipe to kick off my blog! These muffins are nice and light thanks to the whipped egg whites and spicy thanks to the spiced chocolate, so they are perfect for a spot of tea!

Ingredients for 12 muffins:
4 small eggs
140g sugar
90g ground hazelnuts
100g flour
1 sachet (2 teaspoons) baking powder
70g butter
25g groundnut oil

Ingredients for the spiced chocolate icing

100g butter
85g spiced chocolate (if you can't get it already spiced, use chocolate with at least 70% cocoa solids and add cinnamon, vanilla and ground ginger to it, according to your tastes)
15g milk
130g icing sugar

Make the muffins first.

Method:

Preheat the oven to 180 degrees C.
Separate the eggs, adding the yolks to the sugar and mixing them until the mixture goes paler and doubles in size.
Add the baking powder to the flour and set aside for a moment; add the ground hazelnuts the the melted butter to the egg yolk and sugar mixture and then add the flour and baking powder.
Fold the beaten egg whites in slowly and carefully.
Pour the mixture into a pre-greased muffin tin (if not silicone, if you have a silicone tin no greasing is required)
Bake in the oven for 15 minute (or less, depending on your oven - check by pushing the tip of a knife or a skewer into one of the muffins, it should come out clean and dry)
Put the muffins to one side until they are cool.

To make the chocolate icing:

Allow the butter to reach room temperature, then beat it until it becomes soft and creamy.
Melt the chocolate along with the milk in a bain marie.
Once the chocolate is lukewarm, add it slowly to the butter.
Add the icing sugar bit by bit.
When the icing is lukewarm, spread it on the muffins using a spatula or palette knife or use a piping bag.

Put the muffins in the fridge for 1-2 hours to let the icing set.

Enjoy!


Rendez-vous sur Hellocoton !

Partager cet article
Repost0